
So the last few things I've made have been for Other People, and that is an honorable and worthy pursuit, and one I will happily continue. But I do find myself stressing a little about making something worth giving away, and that slows me down (as it well should.) However, with as many theoretical-quilts as I have floating around in my brain, and with as much fabric as I've amassed over the past year, it behooves me to whip out something small and meaningless from time to time, both as a sop to my increasingly loud and insistent quilt-muse, as a skill-building venture, and a reminder of the pleasure to be had in making something practical, but not perfect. Sometimes I just itch to do, without thinking too hard about what I'm doing. In fact, that's pretty much the story of my life.
So I'm usually quite comfortable with perfection as option, rather than necessity, but this time it wasn't even a secondary or tertiary goal. This time, the goals were simple - make something fast; test the use of double gauze as a backing in case of any oddities requiring different sewing techniques for "real" projects down the road; and use one of the hundreds of patterns I've dog-eared (digitally speaking) to work on values as a design element. This is the result, evidencing varying degrees of success - it's about 60" x 70" or "napping size," in the vernacular:
 |
| Sort of a crappy picture of the result, but you get the gist. |
This one is called Canning Day, a pattern by Calli and her mom from their blog Make It Do. Calli's version is a sunny confection of spring greens, yellows, and blues, but her mom's Civil War reproduction print version struck a chord with me - probably in part because of the deep freeze we are experiencing right now lends itself to cuddling under something toasty, preferably by a fire and/or with a hot toddy of some variety to hand, rather than going off on a picnic. In the mom version, the "plus" signs were dark brown or black, the arms of the X were medium values, and the background parts were light. Simple enough, even for me - OR WAS IT?? - so that's what I attempted to replicate, like so:

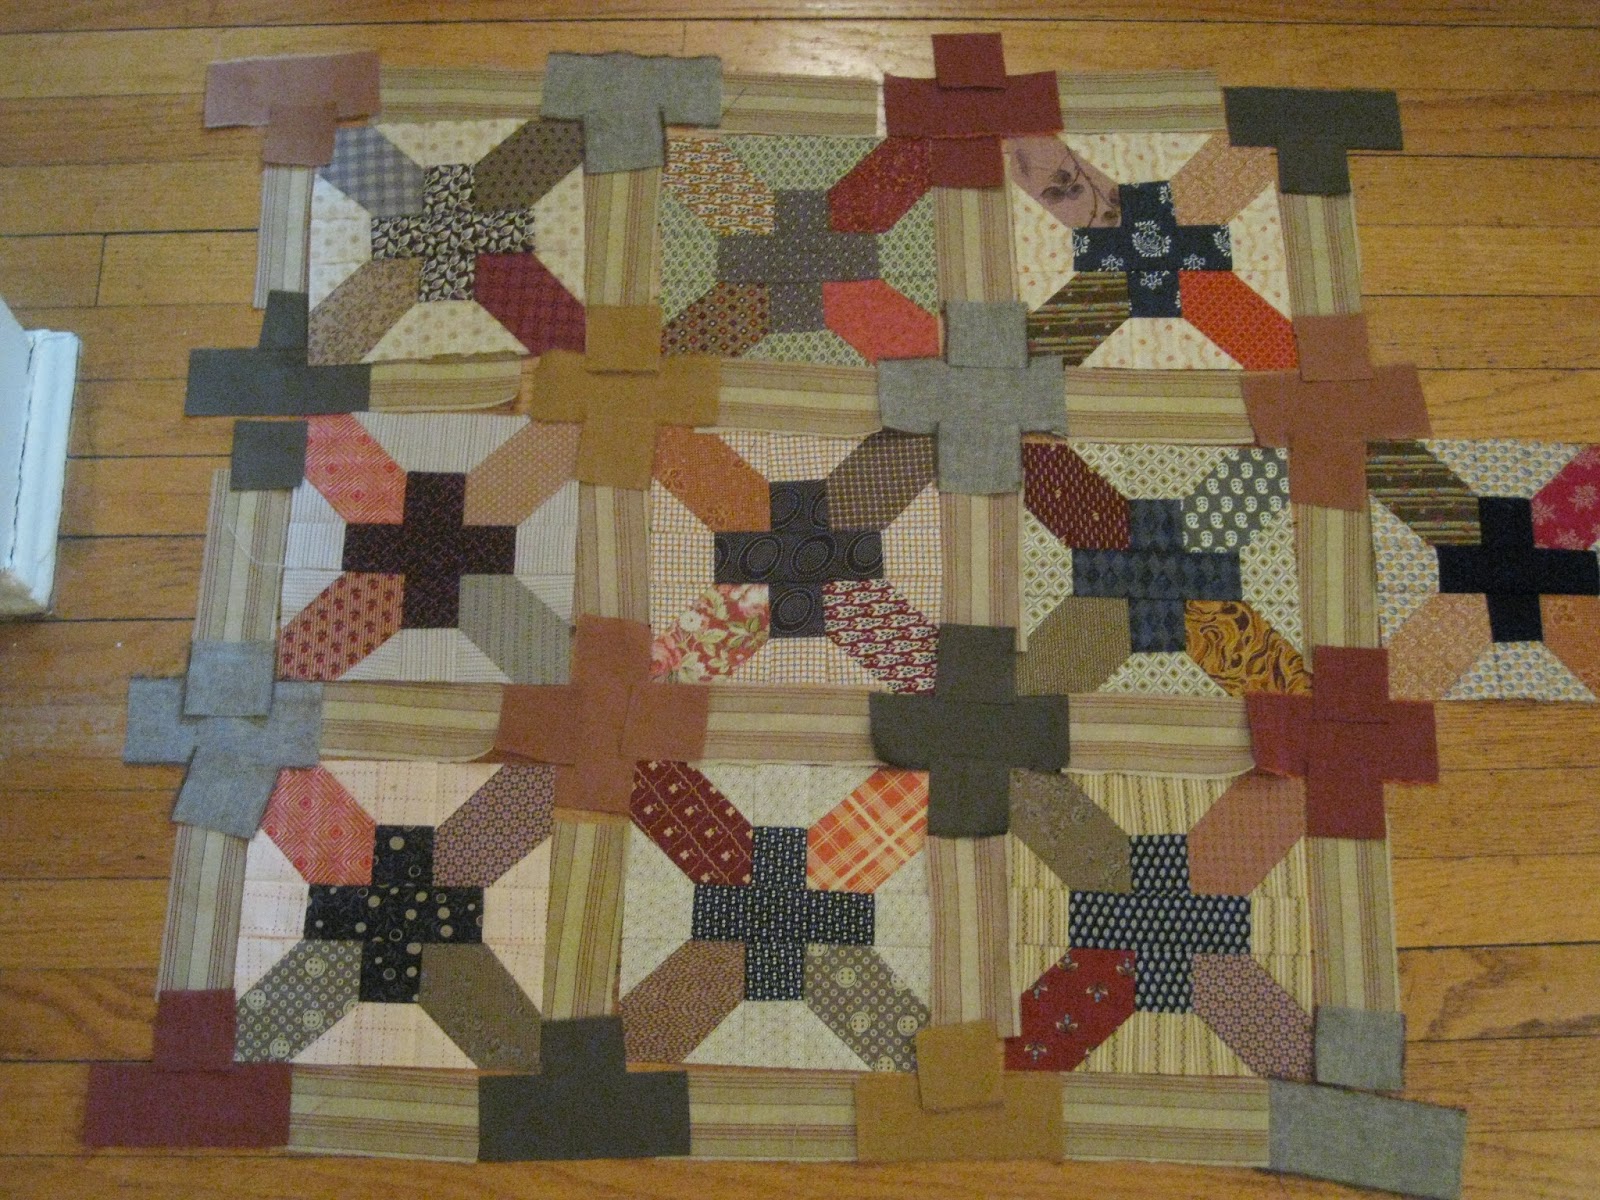
One block of 56, along with my notes on the pattern...black plus, medium tone X, light background...
 |
| ...each made of 19 smaller pieces in this approximate layout. |
Side note: this was also a second pattern that E had liked on Pinterest, but I was already neck-deep in Aspen Glow and so that was the one she got. But it was my back-up for her; and I had a houseguest around then who helped cut pieces for this, and so, Claro, thanks for your assistance, and this will probably be waiting for you on the couch, in the event you need to start looking for apartments around here.
Side note two: I have virtually zero artistic training, so when I talk about colors I expect I sound like a 5-year old with her first box of crayons. To date, I've been all "I like Midnight Blue best," and "Cornflower is too waxy," and "I CAN'T USE THIS ONE, THE TIP IS BROKEN" about it. The Carnival and Colorwash quilts nudged me out of my color comfort zone, but I have much to learn. I'm sort of hoping this little quilty pastime will give me a more practical way to understand color AND design, even if I'm only tweaking other folks' patterns. I mean, in lieu of sitting in the Louvre repainting old masters, I kinda gotta bloom where I'm planted, no?
The piecing on the blocks went delightfully quickly - I think I started the whole shebang about 10 days ago, the cutting mostly done - but I was stymied a little by the sashing. I thought at first I'd jettison it in favor of just doing a cream border around each block, a fairly common way to "modernize" traditional-looking blocks....but belatedly realized that half of the "plusses" were formed in the sashing; and also concluded that this was a pretty self-consciously old-tymey pattern with old-tymey fabrics, and that modernizing it was probably sort of missing the point. In for a penny, in for a pound.
 |
| Laid out on batting to approximate cream sashes...but then starting to add solid plusses. |
 |
| 10 blocks re-laid out with stripey sashing and solid sashing plusses. |
I did, however, choose 5 solids to use in the sashing plusses because I had surprisingly few very dark-reading prints I could use for the black/brown plusses, and the whole thing was getting crazy busy with the patterns and colors and values and ALRIGHT ALREADY. And also taking up the precious not-thinking time during which I could have been half-watching Netflix while hand-sewing or singing along to Tammy Terrell while ironing in my jammie shorts. Priorities, poeple! These were the solid sashing plus colors, which I thought played rather nicely together, fortunately, since they were all I had:
 |
| There is no "I" in "earth tone" |
But this did mean that, right out of the box, I was wrecking my intended value scheme since these read as medium in the overall.
Annoyingly, I found myself thinking of these as "manly" colors - quilt blogs are rife with tips on how to make a manly colored quilt so manly that even your manly man won't mind snuggling under it while watching manly football on his manly leather couch and manfully eating Manwich. Which I think is a little silly: even pink florals will keep drafts off your manly self, and it's not like women can't like brown. In fact, most of my apartment is done in browns, so maybe I'm just touchy on the subject.... and come to think of it, that's probably why I wanted to make this quilt in browns in the first place. I'm down with brown. YET I HAVE BREASTS. ' Tis a conundrum, to be sure.
ANYWAY, the dark, medium and light values were proscribed by my goals for this quilt, but the color combinations per block were "random," by which I mean "I threw them down in no particular order besides liking certain prints more, and then edited perfunctorily until I got sick of that and just started sewing the rows together to lock myself into a final layout." I did attempt to spread out the very obvious fabric clusters - that orangey-yellow plaid congregated conspiratorially in one corner, for instance, and their little faction needed to be broken up. Some of the black plusses read as actual solids and I determined I liked those distributed regularly. But then my non-random, favorites-playing selections resulted in the section below, which shot I actually took to illustrate how those two black prints towards the left side are the same and so close to each other. Then I realized, on closer inspection, that the mauve fabric is consecutively repeated.. and those two horizontal burgundy grid patterns are too close, and dammit, those two gray plaids are, too, and so on. Also, that was a LOT of seam-matching to keep the plusses even top to bottom, and match the arms of the Xs in the corners, and o! so much matching, which my haste also did not benefit.
 |
| The light parts make a "snowball", some of which are so misaligned they are more like snowvals. |
But in terms of the prints coinciding, that is the nature of "scrappy" patterns, and certainly I did little to prevent this, and so now that I have made my bedding I must lie under it. At least most of these mid-value fabrics that comprised the arms of the Xs are similar enough that placement oddities like this are relatively unnoticeable in the whole - though now, of course, I notice this corner every time I look at it, and I think, "Astrid, maybe pre-planning is not such a bad idea."
Towards that end, I think my birthday present to myself this weekend will be a trip to Home Depot for cheap pieces of foam-core that I can wrap with batting to make a design wall so I can stick works-in-process up and leave them there for a cogitatin' spell, instead of them commandeering my entire floor and requiring me to walk gingerly around them so the pieces don't fly all around in my wake. (I had to rescue several Canning Day pieces from under my couch, and the size of the free-range dust bunnies under there were alarming and Chernobyl-esque). I have a wee test design panel up right now and it works like a charm - it's just too small to be useful for full-scale quilts. But you can see a little of other things I'm working on up there, which is (SPOILERS!) paper-piecing a few kinds of stars and also some applique. Those attempts are pretty amusing so far, but patience is a virtue. I hear.
 |
| Test design panel sitting on the radiator, center, blue and yellow test star visible. |
Which leads me to my final lesson from Canning Day - the general value placement was the goal, and once that was over (i.e., once the top was sewn together) I found my interest waning. For one thing, with no one to give it to, the finish was not so exciting. For another, I kind of hate machine quilting. I wanted to machine-quilt this one, so I could get a feel for quilting the scrumptious olive green double-gauze I used for the backing. Which, ONCE AGAIN, was not actually wide enough for the quilt. Is this some kind of immutable law of quilting, that your selected backing fabric will BY DECREE by 3 to 8 inches shy of the width of your front? Gah. Hence, another stripey pieced panel is born - this one made up of leftover 3.5" strips I had cut for the arms of the X squares from the front.
 |
| Olive fabric on top of pieced front, the sides of which are visible. SIGH. |
 |
| Back to the drawing board.... |
 |
| Now she's wide enough. |
And gazing upon the quilt sandwich (which I spray baste, which is a billion times easier than basting with pins or thread) I thought of all the talented machine quilters out there who see a quilt sandwich as a blank canvas on which they can work their magic.... and I utterly punted and just sewed straight (sort of straight) parallel lines (sort of parallel) along both edges of the diagonals formed by the Xs, which quilting mostly disappeared on the busy front but created a simple plaid-grid thing on the back. A wonky plaid-grid, but still.
 |
| Not precisely ruler straight, but gets the job done. |
 |
| Criss-cross intersections at the center of the plus. And another set of consecutive orange/red grid fabric, dammit. |
And the reason I know that I don't care about machine quilting, at least not so far, is that while the haphazard color placement and badly matched seams do irk me even just to contemplate, that crappy quilting does not. And so the quilt in review can be summed thusly -
THINGS I LIKE DOING AND FOR WHICH I CARE ABOUT THE END RESULT
1. Color and value
2. Correctly aligned pieces to reinforce intended geometric pattern
3. Hand-sewing a binding
4. Editing real randomness into ordered, simulated randomness
5. Ironing in my jammie shorts
THINGS NOT IN THE ABOVE CATEGORY
1. Machine-quilting
And with an unexpected day off from work today because of the toxically cold weather, I went from dusty, sash-free blocks on the floor on Friday night to a quilted piece with binding ready to be hand-sewn to the back today, about 10 days from start to finish (not counting a bit of the cutting, done in mid-fall by Claro, or fabric selection, which seems to take me months no matter how narrow my focus.) And that has its own sort of satisfaction, though I don't think I'll be winning any prizes at the county fair for inventiveness or execution on this sucker. On the other hand, that double-gauze was no trouble to quilt with a sharp needle, and is already proving to be a delight to snuggle under while I sew the binding, as the ice builds up inside my windows. And now I have a few relaxing evenings ahead, sewing binding while I pay half-attention to something on Netflix (I'm thinking Eureka is next) and start working out which theoretical-quilt is next on the chopping block.
 |
| Binding sewn to front, yet to be hand-sewn to back. |
I'm calling that one good. Viva la imperfection!
No comments:
Post a Comment